Wednesday, March 23, 2011

Mini Size Apple Pie

   For our family night dessert, my son wanted to make an apple pie..we decided to make one for each person!  They turned out cute and the kids thought it was so fun to have their own little pie.

 Use a basic single pie crust recipe. This should make 6 little pies. Roll real thin and cut six 6" circles for the bottom crusts. Line muffin tin with your circles.  Make sure your crust doesn't crack or break, this will cause the juices from the apples to leak into the bottom of the tin. I noticed the pies that leaked at the bottom got stuck when pulling out. The pies popped out nicely when there was no leakage at the bottom or sides. Make six more circles about 3 1/2" round for the tops. Set aside.
Fill the crusts with your favorite apple pie recipe. Fill them high because the apples cook down.
I make my own apple filling and it's different every time, but here is what I used in these ..If you want to try it..

5-6 medium apples peeled. Slice thin and cut into 1/2"-1"pieces.
2 tsp lemon juice
1/2 cup brown sugar
1/2 tsp cinnamon
1/2 tsp vanilla
2-3 Tbsp flour
Toss ingredients together. Spoon into crusts.

Put your crust tops on, crimp edges and poke holes in top.
Bake for about 35-40 minutes
Crust should be golden and juices bubbling out the top.
I let mine cool in the pan. The ones that didn't leak on the bottom came out nice and easy.
ENJOY!

Thursday, March 17, 2011

Embellishing A Solid Shirt!

   Add some flare to those plain shirts!  This solid shirt needed a little embellishment!  I found some scrap fabric and three buttons that would dress this shirt up a bit. Now it has color and looks more fun!

Supplies needed: scrap fabric, solid shirt, buttons, sewing machine, needle and thread
 1. I cut the scrap fabric into a rectangle and centered it near the top, on the front of the shirt. I liked the frayed looked and so left the edges raw. Pin and sew a zigzag stitch around the rectangle 1/4" from edge.  I went around twice.
 2. Position the buttons where you want them. I centered them in the middle of the rectangle. Sew them on with a needle and thread.  I matched my thread to the color of the buttons.   DONE!! Yippee!!
                                                Cute and Simple!
                                                            

Thursday, March 10, 2011

Pajama Pants Tutorial

  My little girl was in need of some more jammies..cozy warm jammies.  It is still quite cold outside and there are times when spring seems so far away.  As I was looking around in my kids closet I found an old flannel receiving blanket.  It must have missed the baby girl box some how. As I looked at the flannel blanket, I thought FABRIC!  Great for those warm PJ's! Plus they make soft jammies that are instantly broken in. If you are ever in need of fabric and want to be thrifty..look around your house..You would be surprised at what you can find and use.  Re- Purpose! Here is an old pioneer saying:
                                         
                                              USE IT UP, WEAR IT OUT, 
                                           MAKE DO OR DO WITHOUT!

Supplies needed: Old blanket, Scissors, Thread, Sewing Machine, Iron, 3/4" Elastic (or other size)
 1. Fold the blanket so you can cut out 2 legs.  I made a quick sketch of what a leg would look like. You can also get a pair of pants to use as a pattern. I used a pair of pants for length. Cut out two legs on the folds. Note: Measure were you want the waist to fall and add extra length at the waist (approx. 1 1/4") because of the casing that will be made. Also remember 1/2" seam allowance on the legs. I didn't need to hem the bottom of legs because I cut the leg out with the bottom at the hemmed edge of blanket. Be sure to cut extra at the curve to make sure those legs can move.
2. With right sides together sew the inseam of legs 1/2" from edge. Stop when you get to the center. Serge edges or zigzag the edges to help eliminate fraying.  My serger is having problems so I did a zigzag. Iron the seams flat.
3. Pin the 2 legs together at the waists down to the center. Sew from one side of the waist, down to center, back up to the other side of the waist. Zigzag those edges.
4. Cut a piece of elastic the size you want the waist to be plus approx 1" for seam. If using other than 3/4" elastic you may have to change the length you fold over for the casing. With wrong side out, fold the top of pants 1/4" all the way around. Iron it down. Then fold it down 1" and iron. Sew the casing all the way around about 1/8" from edge. Remember to stop when you get near the beginning about 1"-1 1/2"..leaving an opening to pull elastic through. Remember to back stitch.
 
 5. Pull the elastic through. Put safety pins on both ends of elastic. Pin one end of elastic to the pants next to the casing. Push and pull the other end through until you can pull it out the opening.  Pull elastic out a little so it can be sewn together. Overlap the elastic about 1"-1 1/2". Sew the elastic together..sew a box with an x. Put elastic back in the casing. Sew the casing closed. Remember to back stitch.
Before you do away with those old baby blankets..Use them! 
They make good and soft JAMMIES!


Friday, March 4, 2011

Turn Toddler Bodysuit Into A Little Boys Shirt!

  I like onsies to keep the tummy covered and for extra warmth in the winter. I don't mind bodysuits for little newborns, but for my 16 month old, bodysuits are not my favorite.  I hardly ever buy them.  So the bodysuits that were given to my son don't get much wear. I only put them on when we stay around the house or when they are the only thing clean. I decided to transform them into shirts so he could use them more!
1. Lay flat and cut just above the leg straight across to the other side.  Because mine had horizontal stripes it made cutting a straight across pretty easy.
  2. Turn the edge under about 1/4" and then another 1/2" and sew around 1/2" from the edge.  DONE! I'm ready for the next one!
          Extra shirts are nice for a cute and curious, messy toddler!

Thursday, March 3, 2011

Creamy Orange Julius

   If you like the Popsicle that is orange with the vanilla cream center you will LOVE this Orange Julius!  It reminds me of those 50/50 ice cream bars I absolutely loved when I was young.  My kids and I enjoyed this cold delicious treat this afternoon! I had this recipe written on a piece of scratch paper in my recipe box..not sure where it came from. If it came from you..Thank You!! I like it and thought it would be good to share!! I did change one ingredient to make it more creamy...
  
Ingredients: 
  6oz of orange juice concentrate
1 tray of ice
1/2 cup sugar
1 cup half & half
1 cup water
1 teaspoon vanilla

Put all ingredients into a blender. Blend until smooth, but still a little icy. Too much blending can make it runny. How long you blend depends on you and the texture you prefer. Makes approx. 5-6 cups. Serve immediately!!  
                                      Enjoy it before it melts!!

Tuesday, March 1, 2011

Re-purpose: Big Sweater To Sweater Dress...


  Or Sweater Shirt! I found a great hammy down sweater I had that would make a perfect little dress for my 3 yr old..but instead became a shirt for my 7 yr old. This one is quite simple and fast.  I love to re- purpose! It is fun and useful..nothing just sits or wastes!
There is also a great tutorial by MADE in re-purposing a sweater from big to little.

Here is what the sweater looked like before it had a makeover!
Here is the sweater after the makeover!
 Materials Needed:  old sweater, sewing machine, thread, scissors, optional: serger
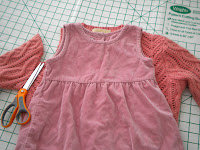
1. Find some armholes that you like on a little shirt or dress. Lay the shirt or dress of choice on the old sweater. Match it at the top where the shoulders attach to the neck hole. The sweater I used had a small neck hole so I didn't have to cut it to make a smaller neck for the new sweater dress. If your neck on the big sweater is too large to make the smaller neck,  follow the tutorial for cutting the neck out and making it smaller by MADE
 2. Cut around the armholes. About 1/2" from the dress armhole. Do the same on other side.
 3. I cut straight down by the following the bodice.  Continue straight or at slight angle, depending on your preference of the shape of the dress. I cut at a slight angle all the way down. I then adjusted it to have more of an A-Line shape.  Make sure to cut the very bottom straight up and not at an angle..This will prevent the visibility of the seam when finished..I know from experience. :)
 4. Fold dress in half and cut other side to match. Should have a dress that is connected at the shoulders.
 5. There may be an easier way to do the sleeve, especially if you have the knowledge of a true sewer..but I just cut..and it worked. To make little sleeves, lay the big sweater sleeve under the dress armhole at an angle.  Make sure you fit it where the dress armholes don't go off the edge.  If you lay the sleeve straight you will notice the dress armholes go off the sleeve. With sleeve at angle and dress edges on big sleeve, cut out your sleeve.
  6. Lay small sleeve on the bottom of the 2nd big sleeve and use it as pattern..Cut the second sleeve.
 7. To help prevent against unraveling serge around the raw edges of dress. (Don't serge or sew dress together, just  serge or sew the raw edges.) Cutting barely, if any off.  If you don't have a serger, sew a zigzag stitch on the edge around the raw edges of the dress.  Do the same with the sleeves.
 8. All ready to sew together! Pin the sides of the dress and sew them together 1/2" from edge.
 9. Put the sleeve inside of the armhole so right sides are together. Pin at bottom or armpit first to make it line up right and seams match. Pin the rest of sleeve.  Sew around the sleeve 1/2" from the edge. Do same to other sleeve.  Last picture shows the dress finished, wrong side out. 
 The dress was originally for my 3 yr old, but I preferred it as a long shirt for my 7 yr old.  She liked it much more than my 3 yr old and I like it better for her too!  Now that old sweater in the closet will be like new! It will get worn, used and loved!!  
Related Posts Plugin for WordPress, Blogger...