Friday, February 25, 2011

Tutorial For Little Boy Reversible Apron

My Little Cook!
  My son is a SUPER helper!  He loves to help cook!  There is one thing he is missing...an APRON!  The girls have one, but what about him...so WE made an APRON just for him!  I say WE because, of course he wanted to help. He pick out of the scrap fabric box and we got started. We made it REVERSIBLE and SIMPLE!  I added a tutorial in case you wanted to make one for your boy..or girl..yourself..anyone really! I don't claim to be a sewer..I am a self learner.  Please forgive me for my ignorant sewing terms and hopefully I didn't make something simple sound complicated. HAVE FUN!  I DID! :)

 Supplies: Paper and pencil, Sewing machine, Measure tape, Scissors, Pins, Thread, 2 Different Fabrics-about 1 yard each.(may need more or less depending on size of apron and depends how much you want left over. 1 yard can make at least two toddler aprons. I had plenty left over and I like left overs for other projects!)
1. Pick your fabric! Washing and ironing it is a good idea.
2. Take your paper and pencil write down the measurements of the person the apron is for..what you want the finished apron to measure. My measurements are for my 5 yr old son. First measure across the top of the chest, approx from armpit to armpit. This exact pattern will fit a bit big for an average 4yr old and can go to 6yrs.  We wanted the apron bib to cover his chest real well and wanted the finished bib to be 9". Next Measure from top of chest or armpit down to about the waist or where you want the apron base to wrap around so it can tie in back. We measured about 7 1/2". We decided on 3 1/2" for the wings of apron base. This way it wraps around good. 10 1/2" for length of base.  It falls just about 2"- 3" above his knee. Now remember to add 1" to all you measurements for seam allowance. We will be doing 1/2" seam all the way around the apron.
Here is a picture, hopefully not too confusing.  You will see only half an apron because you cut it on the fold. 
3. Fold fabric in a way you will get less waste. Then cut out apron following measurements. *remember to cut your bib and base measurement in half because we are cutting on the fold..hence it will be doubled when opened up. The bib is 5" ( 9" + 1" = 10" divided by 2 = 5").  Don't forget to add your extra inch!
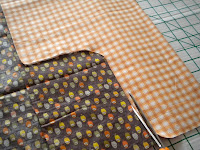
Cut down about 7 1/2" then curve at approx. 8" and continue straight when you are approx. 8 1/2". The center of the curve will be approx. 8". Continue cutting straight the 4 1/2" (3 1/2 "+ 1") for the wings on the base of apron.  Refer to picture..each square is 1".
4. Cut down 11 1/2" for the base of the apron. Now do the same on the second fabric..using the first cut out as the pattern. You should have 2 apron sides.
  5. Making the ties.  Decide how long you want them. I made the ties for the waist 2" x 21" and the ties for the neck 2" x 18".  Finished at 1 1/2" x 19 3/4" for neck and 1 1/2" x 16 3/4" for waist. Cut strips of fabric for the ties. You should have a total of  4 neck ties (2 in each fabric) and 4 waist ties (2 in each fabric).  
6. Sew the strips to make ties.  With right sides together sew two strips around the edge 1/4". Leave one end open so you can turn right side out. Iron after pulling it right side out. Repeat process for other 3 ties. Set finished ties to the side.
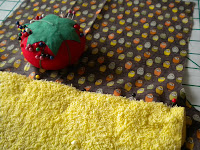
7. Before we sew the two apron sides together lets add some pockets and a wash cloth...there are many options to embellish the apron.  For one side we did pockets out of the opposite fabric. The other side we chose to add a wash cloth. Let's do the wash cloth first.  You may have to adjust to size of wash cloth used. I used a simple cheap cloth. The wash cloth I used fit the center just right. Fold the wash cloth under on one side about 2". This will be the top attached to the waist.  Measure cloth approx. 2" from the bottom and center it on the front. Pin top and sew across from one side to the next 1/4" from edge. Be sure to back stitch.
  I turned the foot and went over it again and then again. I went over it 3 times for strength.
 8. Pockets! Cut 2 rectangles in each fabric. Each one 6" x 7 1/2". You may want bigger pockets. Pin right sides together and sew 1/2" from edge all around, leaving one 6" end open.
Turn the pocket right side out. Iron flat. We wanted the opposite fabric to show. Turn the opened end over 1/2", iron and turn again 1/2" this will make the finished top of the pocket. Iron & sew along edge about 1/8" .
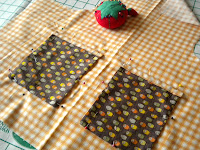
 9. Place the pockets on the front of the apron side without wash cloth. Pin them 3" from the bottom and 4 1/2" from the edge. (may differ depending on size of apron and pocket.) Sew around the outside of pocket 1/4" , but make sure you don't sew the top or you will have patches not pockets. :) Make sure to back stitch at the beginning and the end. Starting about 1/8"-1/4" before sewing on the pocket and same when ending. Sew off the pocket 1/8"-1/4". This will help secure and give strength.
 10. Attaching the ties and we are almost done! Yippee! Pin the ties for the waist (shorter ties) on the front of one of the apron sides. Raw edges together. Pin near the top corner of the wing of the base approx 1/2" from the top to allow for the 1/2" seam around apron. Pin one on each side. I did contrast fabric again. Pin the contrasting apron side on top. Do not pin the top.  With right sides together, sew all the way around apron, except for the top 1/2" from edge. Pull right side out and iron flat..almost done!
 11. To attach the neck ties, first iron the top of the bib in about 1/2". Place the tie (raw edge in) 1" in and pin closed. Sew close to edge about 1/8" along the entire top. Remember to back stitch.
 12. Next sew a rectangle at the top where the ties lay in the seam. This will give them strength and durability. Sew along the stitches at the top. Then make the rectangle the approx length and width of the tie end that was inserted into the seam. Do opposite tie as well. Also go back and sew rectangles for the ties at the waist.  To finish, sew near the edge at the bottom. About 1/8". You are finished!!
     Now you have a fun, reversible, durable, simple apron for your little cook!

Sunday, February 13, 2011

Cookie Bouquet Tutorial!

Yummy Valentine Bouquet!

 Materials: Cookies for flowers, Skewers, Jelly candies, Pot or something to hold cookie flowers (I got my pot from the dollar store), Instant chocolate pudding and Oreo cookies (generic brand works just as good.) 
* For the flowers store bought cookies with a hole work great. Homemade cookies are yummy too, but because they are soft they may crack when putting skewer through the center.
Note: Amounts depend on size of pot and size of bouquet.
 1.  To make the dirt cake for the bouquet, ground up oreos to look like dirt. Put about 1-2 inches in bottom of pot.

 2. Make pudding to the pudding pie directions on package. Pour into pot on top of ground cookies. Put another 2 inches of ground oreos on top of pudding or fill almost to rim of pot. Place dirt cake in the refrigerator to set and chill.
                                                   Next are the flowers!
3. Poke a skewer through the center of a jelly candy and then through the center of a cookie. Top with another jelly candy.
 4. Poke Flowers into the dirt cake and tie a ribbon around your pot if you desire.
                Now you have a beautiful bouquet of sweets to give to someone!

Thursday, February 10, 2011

Love!

 Valentine's Day is coming up! I posted a few good finds that I have come across over the years. These all have to do with LOVE!

This is a 2 minute video that gave me a desire to be and do better! It is a message from Thomas S. Monson on What Matters Most!
   
  If you want a short read, this book is perfect! This is a cute little book that was given to me years ago. F. Burton Howard uses a real life parable from his experience to share how special marriage is.


 Here is a quote from Gordon B. Hinckley
               
               True love is not so much a matter of romance 
                              as it is a matter of concern 
                     for the well-being of one's companion. 

Tuesday, February 8, 2011

Flower Clip Tutorial! Clip It Anywhere!


Flower Clip!
Materials needed:  felt, fabric glue (I used Fabri-Tac), bobby pin
 1. Cut a felt circle (my circle is about 1 1/4" round)       2. Cut the circle in a spiral.
 3. Start rolling felt from the outside in.
 4.Glue the end to the side of roll. This will hold the circle.  It will look like a little cinnamon bun.  Make 7 little rolls. You will have 6 petals and 1 center. Optional: attach a bead to the center
5.Cut 2 felt circle for back, mine is about 1 3/8".  Glue center on 1 felt back and then glue petals around. 
                                                  You should have a flower!
6. Put the second felt back inside of the bobby pin. Put glue on the back. Make sure the flat side of bobby pin is on the bottom. Attach it to the bottom back of flower and let dry. Next time I would make the flower a bit larger to hide the bobby pin.
  Wear It Everywhere!!

Friday, February 4, 2011

Ruffle Shirt Tutorial! Create A New Look!

  Valentine's Day is coming up!!  What are you doing for the sweeties in your life?  The next few days I will add some fun and easy gift ideas that even the youngster can make!  With a few adjustments these ideas can be for anytime of year!

       Ruffle Shirt!
         Fix up a shirt that is hanging in the closet or add some flare to an old shirt! Cover up stains! My daughter had a hammy down shirt from her big sister that she hardly wore. If you like ruffles here is a simple makeover! I decided to add ruffles in the front to cover the heart design that was on the old shirt. The ruffles give the shirt a vintage feel.  I love it and she loves it! 

* The ruffles on this shirt cover about a 4 1/2" x 5 1/2" area. Note that the size of your background fabric and ruffles may need to be different depending on the area you need covered on your shirt.
1. Cut a 4 1/2" x 5 1/2" piece of fabric that matches or contrasts the fabric for the ruffles. Fabric for the background is needed to hide the old design on shirt. Pin and sew rectangle to the shirt. Sew 1/4" from edge.
 2. Cut 7 strips from the fabric of choice.  Each one 1/2" wide and 10" long.
 4. Sew a basting stitch (or the biggest stitch) down the center of each strip.  Gently pull on the bottom thread to make it ruffle. Bunch it up to about 5 inches long.  Turn under the top and bottom of ruffle about 1/4 " and pin the ruffle on the background fabric.  Do the same to the other 6 strips. I pinned a ruffle about every 1/4" Starting 1/4" from the edge. I left the edge of the ruffles raw because I like the frayed look.
 5.Sew down the center of each ruffle. Remember to back stitch and cut thread tails. Simple as that!!  Out with the old and in with the new!  You can be even be more creative and make designs.  Have fun!!!
                       Dress up for Valentine's Day with a new shirt!

Related Posts Plugin for WordPress, Blogger...