My son is a SUPER helper! He loves to help cook! There is one thing he is missing...an APRON! The girls have one, but what about him...so WE made an APRON just for him! I say WE because, of course he wanted to help. He pick out of the scrap fabric box and we got started. We made it REVERSIBLE and SIMPLE! I added a tutorial in case you wanted to make one for your boy..or girl..yourself..anyone really! I don't claim to be a sewer..I am a self learner. Please forgive me for my ignorant sewing terms and hopefully I didn't make something simple sound complicated. HAVE FUN! I DID! :)
Supplies: Paper and pencil, Sewing machine, Measure tape, Scissors, Pins, Thread, 2 Different Fabrics-about 1 yard each.(may need more or less depending on size of apron and depends how much you want left over. 1 yard can make at least two toddler aprons. I had plenty left over and I like left overs for other projects!)
 1. Pick your fabric! Washing and ironing it is a good idea.
2. Take your paper and pencil write down the measurements of the person the apron is for..what you want the finished apron to measure. My measurements are for my 5 yr old son. First measure across the top of the chest, approx from armpit to armpit. This exact pattern will fit a bit big for an average 4yr old and can go to 6yrs. We wanted the apron bib to cover his chest real well and wanted the finished bib to be 9". Next Measure from top of chest or armpit down to about the waist or where you want the apron base to wrap around so it can tie in back. We measured about 7 1/2". We decided on 3 1/2" for the wings of apron base. This way it wraps around good. 10 1/2" for length of base. It falls just about 2"- 3" above his knee. Now remember to add 1" to all you measurements for seam allowance. We will be doing 1/2" seam all the way around the apron.
Here is a picture, hopefully not too confusing. You will see only half an apron because you cut it on the fold.
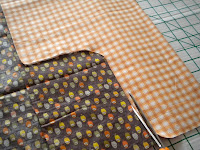
3. Fold fabric in a way you will get less waste. Then cut out apron following measurements. *remember to cut your bib and base measurement in half because we are cutting on the fold..hence it will be doubled when opened up. The bib is 5" ( 9" + 1" = 10" divided by 2 = 5"). Don't forget to add your extra inch!
Cut down about 7 1/2" then curve at approx. 8" and continue straight when you are approx. 8 1/2". The center of the curve will be approx. 8". Continue cutting straight the 4 1/2" (3 1/2 "+ 1") for the wings on the base of apron. Refer to picture..each square is 1".
5. Making the ties. Decide how long you want them. I made the ties for the waist 2" x 21" and the ties for the neck 2" x 18". Finished at 1 1/2" x 19 3/4" for neck and 1 1/2" x 16 3/4" for waist. Cut strips of fabric for the ties. You should have a total of 4 neck ties (2 in each fabric) and 4 waist ties (2 in each fabric).
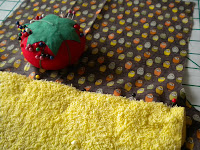
7. Before we sew the two apron sides together lets add some pockets and a wash cloth...there are many options to embellish the apron. For one side we did pockets out of the opposite fabric. The other side we chose to add a wash cloth. Let's do the wash cloth first. You may have to adjust to size of wash cloth used. I used a simple cheap cloth. The wash cloth I used fit the center just right. Fold the wash cloth under on one side about 2". This will be the top attached to the waist. Measure cloth approx. 2" from the bottom and center it on the front. Pin top and sew across from one side to the next 1/4" from edge. Be sure to back stitch.
I turned the foot and went over it again and then again. I went over it 3 times for strength.
8. Pockets! Cut 2 rectangles in each fabric. Each one 6" x 7 1/2". You may want bigger pockets. Pin right sides together and sew 1/2" from edge all around, leaving one 6" end open.
Turn the pocket right side out. Iron flat. We wanted the opposite fabric to show. Turn the opened end over 1/2", iron and turn again 1/2" this will make the finished top of the pocket. Iron & sew along edge about 1/8" .
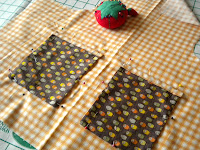
9. Place the pockets on the front of the apron side without wash cloth. Pin them 3" from the bottom and 4 1/2" from the edge. (may differ depending on size of apron and pocket.) Sew around the outside of pocket 1/4" , but make sure you don't sew the top or you will have patches not pockets. :) Make sure to back stitch at the beginning and the end. Starting about 1/8"-1/4" before sewing on the pocket and same when ending. Sew off the pocket 1/8"-1/4". This will help secure and give strength.
11. To attach the neck ties, first iron the top of the bib in about 1/2". Place the tie (raw edge in) 1" in and pin closed. Sew close to edge about 1/8" along the entire top. Remember to back stitch.
12. Next sew a rectangle at the top where the ties lay in the seam. This will give them strength and durability. Sew along the stitches at the top. Then make the rectangle the approx length and width of the tie end that was inserted into the seam. Do opposite tie as well. Also go back and sew rectangles for the ties at the waist. To finish, sew near the edge at the bottom. About 1/8". You are finished!!


No comments:
Post a Comment